Pages

Dec 30, 2009

My top favs. of '09


reading Sasha's post on FB gave me this idea and yah, I'm a day early, but wanted to share this anyway. I chose 9 of my favorite paperish projects from this past year. Looking back on everything I've created, 4 things stand out the most to me, I love my sewing machine, spray paint, Elles Studio & Kitschy Digitals!!

Out of all the fabulous-wonderful most beautiful creations you've made this past year, what are your favorites? Happy New Years!

Dec 26, 2009

Happy Holidays to you,


Did you survive the whirlwind of the holidays this year? I actually took a very long and much needed nap this afternoon. One stressful trip to the airport and I needed a rest! That whole week before Christmas just seems to go by so fast, and every year there is more and more to do. Next year, I will definitely have a schedule planned out and will sticking to it!


Alaina with her new Barbie. (I hate to use the flash on my camera, but it was so early when she wanted to open presents that it was still dark outside. Too bad kids don't unstand the importance of naututral light for good photos!! haha ;))


my little guy on Christmas morning, with some serious bed-hair!!

After presents and breakfast Christmas morning, we decided to pack a picnic lunch and head out to our favorite park. Alaina brought along some bread to feed the ducks. Chase didn't quite grasp the concept of feeding the ducks bread, but that was okay too because he was too cute walking around eating his slice of bread!


Alaina danced around in the sunlight and posed for a few pics.


and for 3 days, we had 2 doggies. Leonardo DaVinci, a 4 yr. old Westie, came to join us for the holidays. Chase loved him and Alaina had him sleep in her room. He was a cute little boy dog, who had one trick of sitting up and begging that was quite effective with the kids!


Now for the clean up!! We have lots of family arriving soon and I'm kind of looking forward to doing some touristy stuff in the next couple of weeks. Oh, and getting back to crafting again!! I took the entire month off to focus on the holidays, and I did make a few things for some custom orders, but nothing for myself. So, I'm really excited to pull out the sewing machine and play with some paper this weekend!

Hope everyone had a wonderful holiday this year!

Dec 17, 2009

a Winter Wonderland

I'm usually a big fan of color, but this time of year, things seems a little simpler and I end up leaning towards white and other light colors. Alaina has spent the last few days at home with me, (too much shopping this past weekend) and we came up with an idea to take 'light-white' colored photos. It was actually a fun (and a little challenging) idea for a photo theme, while we searched the house for items to photograph. It was also a great excuse to get out the Anscoflex and play with some ttv photos. Oh, how I love that little old camera!!


I'm going to finish my afternoon with a little more gift wrapping, some old holiday music and a Pumpkin Latte. Have you started/finished your gift wrapping already? I feel like I'm behind this year, Christmas is coming much sooner than I anticipated!! I have a small surprise to share, hopefully this weekend and it kind of ties in with my winter white theme. So excited about this one ~ Be back to share photos soon!!

Dec 14, 2009

Candy Ornaments - Tutorial

Can you believe that Christmas is only 10 days away!! It's going by so fast, and there are still so many fun things to do and make! I'm planning a sugar cookie decorating party this weekend, and Alaina and I have been busy making ornaments this past weekend. We wanted to share one of our favorites, it's a super simple candy ornament, that is easy to make, pretty to look at and even sweeter to eat!
*This 'recipe' will make about 14 ornaments, only if a few don't get eaten in the process!!*


Materials Needed:
2 14oz. packages of Jolly Ranchers
metal cookie cutters
non-stick cooking spray
non-stick foil or Silpat
cookie sheet
ribbon
tooth pick or chopstick


Directions:
1. Unwrap all of the Jolly Rancher candies.
2. Line a baking sheet with foil or Silpat and lightly spray the cookie cutters with non-stick spray.
3. Preheat oven to 325 F.
4. Place all of the cookie cutters on the cookie sheet, and fill with one layer of Jolly Ranchers. (the more colors you use, the more the ornaments resemble stained glass!) You can also break the candy pieces to get them to fit into the cookie cutters better.
5. Once all of the cookie-cutters are filled with candy, you're going to put them into the oven, and cook for about 10 minutes. Or until the candy has completely melted. (Don't worried if the candy melts out of the molds, once it hardens it's easy to break away from the cookie cutter.)
6. Wait about 3 to 4 minutes, and spray non-stick spray on the tip of a chopstick, and make a hole close to the top of each ornament. (It takes a few minutes for the candy to cool enough to make the holes. If the candy is still to hot, the hole will close, so just be patient and wait a minute longer. I know this from experience! :))
7. After the candy has completely cooled, about 30-45 minutes, lightly pull the cookie cutters so that the candy ornaments comes loose.
8. String with ribbon and hang on the tree!


I'm thinking of doing this project with Alaina's friends when they come over next. A perfect project for the little ones, and I can send home a little box of ornaments that they made. I love quick crafts! Hope eveyone is enjoying the holiday season!!

Dec 1, 2009

Tis the Season


my newest Elements D'Art creation for the Bad Girls Blog!! I'm reposting the project here, because typepad doesn't like my photos.

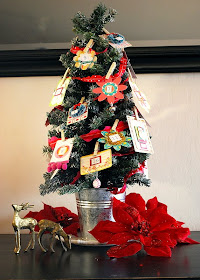
Every year on black Friday, I make my way over to the local Hallmark store to pick out the perfect holiday ornament for our gift exchange. This year, I brought along my 5 yr. old, Alaina, to help with the decision. She promptly found the display of Advent calenders and absolutely had to have one. Being the scrapbooker that I am, none of that commercial stuff would do and I started dreaming up cute ideas for making our own calendar this year!

I decided to make our calendar using a small 2 ft. Christmas tree that we're going to display as our table centerpiece. All 25 of our day ornaments are made using super cute Sassafras Paper Whimsies and Sassafras Paper Flowers. (They look like they were made for this project!!) I collected extra items for embellishing each card like; jingle bells, toy candies, tinsel, glitter, snowflakes, stickers, toy wreathes, flowers, trims and small pieces of lace. There are so many cute little items that could be used, and most likely already in your stash!


Next, you'll start by embellishing each card and layering the paper flowers to together. ** To make the sugared clothes pins, just paint small clothes pins a neutral color and sprinkle glitter on. This was the perfect little project for Alaina, and it kept her occupied while the glue was drying!!**


Once all of the cards are embellished you can print a page of numbers, or search through your stash and use stickers! I glued and sewed each of the tiny numbers onto a card/flower using an all purpose glue. I recommend Aleene's original Tacky Glue.


I used a bright pink a red ribbon as garland for our tree. It also made it a little easier to clip all of the date cards too. Alaina can't wait to start adding each card to the Christmas tree and we hope maybe this project will be something you can share with your own little ones! Happy Holidays xo~ Tara


ps. my crafty friend Angie had the wonderful idea of making a card each day starting with today all the way up to the 25h. I think that would be a great-fun evening craft to do with kids!!

Nov 20, 2009

Kitsch love


Thought I would share a couple of projects that I've made recently for Kitschy Digitals. I got to use the Wood Grain cut-out sheets and I think I'm in love with woodgrain! They are so lovely, with soft muted colors and sharp detail. The frames are available Kitschy Digitals.


I made a thankyou gift for a family friend and then found this cute Martha Stewart gift box. It's tiny!! The feather accents are also available as cut-out sheets at Kitschy Digitals.


I'm learning to love velum all over again!!! (remember how popular it was when scrapbooking first started?)


& finally a tiny canvas frame was the perfect size for altering. I love little projects!! I glued alpha. letters to the canvas and then applied thick coats of paint. I used the smallest sized frame on the cut-out sheet for this project.


I want to make a few holiday inspired tags using some of the cutout sheets and maybe some gift adornments.... oh the possibilities!

Nov 18, 2009

Pumpkin Pie Smoothie - Recipe

A few weeks back, I made Pumpkin Pie Milkshakes for dessert. They were a huge hit in my home, particularly with the 5 yr. old crowd. One morning though, I had a craving for another one, but the guilty part of me couldn't justify ice cream for breakfast. So, I went to work looking for ingredients already in the fridge that I could use to make something healthier. A pumpkin Pie Smoothie. Here's my version and I actually measured everything too!


Ingredients
3/4 cup canned Pumpkin Pie Filling
1/4 cup Plain Yogurt
1 1/2 cups crushed ice
1/2 cup Soy Milk
1/8 cup Applesauce
1 Tbls. Sugar (I have a sweet tooth, so you may want to try a 1/2 Tbls. to start)
1/2 tsp. Pumpkin Pie Spice

Directions
Put the ice into the blender and crush.
Add all other ingredients and blend together.

makes 2 large servings

Nov 16, 2009

Apple Butter, recipe


Now that apples are in season, here is the best Apple Butter recipe, and because it's my mom's! I love having a pot of this cooking on the stove in Fall. I add apple butter to almost everything, it's especially wonderful on toast, pancakes or waffles and pumpkin bread. Hope you enjoy the recipe!!


Apple Butter

2 lbs. Rome Beauty
2 lbs. Golden Delicious
2 lbs. Newton or Granny Smith
1/2 c. apple juice or cider
1-3/4 c. sugar
1 t. lemon juice
1-1/2 t. cinnamon
1/2 t. allspice
a pinch of ground cloves


Directions:
Wash, peel, core & slice apples.
Combine with apple juice & bring to boil on medium.
Reduce heat & cover.
Stir occasionally until apples are tender, 20-30 minutes.
Puree in blender or food processor until smooth. (I used an immersion blender)
Return to heat; add sugar, lemon juice, & spices.
Bring to boil.
Turn down to simmer and partially cover until thick, stirring occasionally.
Can in jars or freeze.


Serve on muffins, toast or our favorite waffles! Enjoy! 

Oct 26, 2009

and the winner's are....

First, let me just say thank you so much for spending the weekend here! I read through every comment and loved the responses and the art from the challenges! I really wish I could send out little packages to everyone who participated, you girls certainly deserve it! but I only made 7, so here are the winners!

Challenge #1: Birthday Wish
Random Number Generator : 10

Brenda said...
I think I'd have to pick Italy. Maybe a Mediterranean cruise would be nice.

Challenge #2: Tag Art
Random Number Generator: 13

Alicia A said...
Here's my tag:

Challenge #3: Birthday Wish
Random Number Generator: 2

Marolle said...
i know it impossible now, but i would love to see the beatles :o)
more realistic is Tori Amos

Challenge #4: Tiny Art
Random Number Generator: 11

Amy said...
how fun! Your artwork is so gorgeous! I have posted mine below, sorry for the bad lighting, it is very dreary & rainy here today.

Challenge #5: birthday Wish
Random Number Generator: 33

alexandra said...
a big scrap room ;-)

Challenge #6: Button Guess
Random Number Generator: 29

maiahs_momma said...
120 buttons, that is what I am guessing :)!

Inky Hugs,
Catherine

Challenge #6.5: Color Combos
Random Number Generator: 8

Gina said...
teal, red, yellow and white :)


Please send me your addresses so that I can send you some happy mail! My email is rosas07@msn.com
~~~~~~~~~~~~~~~~~~~~~~~~~~~~~~~~~~~~~~~~~~~~~~~~~~~

Wouldn't having a blog-party every weekend be fun! I also wanted to wish Chris and Karri a happy birthday!! I have the longest to do list this week, and a pile of fabric calling my name, so I'm off to work. xo~ Tara
p.s. there were 274 buttons in my canning jar!!

Oct 24, 2009

Challenge #6.5: Color Combos.

Just when you thought the party was over..... I slipped in an extra one!! So sneaky!!

This one is all about color combinations!! Sometimes I like pretend that I'm an interior decorator, picking out paint samples and matching some crazy colors together. Here's my favorite color combination for the Autumn season.


Black.Grey.Cream.Lilac.Burnt Pumpkin


At this moment, what is your very favorite combination of colors?


Happy Saturday! Thanks to everyone who played along today and if you didn't have time today, I'm leaving all of the posts open tomorrow too! Make sure to check back on Monday morning for the winners of each post! xo~ Tara

Oct 21, 2009

Challenge #6: Button Guess

Good evening! (Or night, or very early morning depending on where you're visiting from:)) Want to play a game?


Remember the children's guessing game, usually a jar full of candy or gumballs, and you had to guess how many were in the jar? I rummaged through my vintage button collection and filled a jar, and now you get to guess how many buttons there are!


leave your guess for a chance to win!

Challenge #5: Birthday Present Wish


If you could a wish for a fun birthday present just for yourself, what would you wish for?

I think I would wish for the perfect set of dinner plates. Dishes are so very important to me and I've been searching for white-ish/cream dishes with a little floral pattern around the edge, for the longest time! Something tells me I need to wander on over to Anthro. some time soon! :)

leave a comment for a chance to win!

Challenge #4: Tiny Art Challenge

Ready for another crafty challenge! Last month for Bad Girls, I had to create a small (4x4) piece of art work. The small size was so easy to manage and still had lots of possibilities! So for this challenge, let's see what you can create on a small scale!!

Need some quick ideas? This little page is probably my favorite! I used a piece of painting canvas and sketched a few flowers and then I used Gesso to paint over them. I added a few little pieces of paper to the top and bottom and sewed the title onto a piece of fabric, to add some dimension. (I think I may add a few more penciled flowers too!)


This page is super simple too! Just strips of paper, sewn together, with a small photo, and some little embellishments clustered together.


A little tag with lots of mismatch scraps was worthy enough of it's page. I love using postage stamps!


Ready to create a little work of art? Don't forget to post a link when you're done, and you have all day and tomorrow to create something fun!!

Challenge #3: Birthday Concert Wish


If the tiny birthday fairy came to visit and could grant you tickets to any music concert, who would you want to see?

I really want to see the Trans Siberian Orchestra. (kinda of dorky, but oh-well!) I love their Christmas music, traditional old Christmas songs blended with 80's-ish electric guitars. What's not to love! My sister said it was one of the best live concerts she had seen. So I definitely need to go!

and because I never posted a photo, these are the gift bags I put together.(there are a few more things, but I wanted my photos to be pretty, it'll be a surprise!) and there's one for each post today, so you can enter with each challenge that goes up!


Leave a comment for a chance to win!

Challenge #2: Make & Take tags

ETA.: you have all day today and tomorrow to complete any of these challenges/questions, so stay calm and just have fun!

This challenge is all about cute tags! All you have to do is create a gift tag and then post it in an online gallery, flickr, your blog and make sure to include a link in your post, so that I can find it! Easy enough right? But here are a few ideas for making fun little tags out of things you probably already have in your stash!

Chipboard Flower tag
For this tag, I sewed together left-over chipboard shapes. You could overlap and glue the shapes together too. Create a little collage using a piece of fabric, a stamp, flowers and a journaling tags, and a piece of yarn for tying!


Ballerina Gift tag
This is my favorite tag! Gather a small collection of buttons, preferably with the same color tones, and sew/glue them onto a tag. Glue a piece of ribbon over the buttons, add a leaf or flower and a small children's toy and glue together using a strong glue. (E6000 or Aleene's Original Tacky glue.)


Small Scraps
I love to use little pieces of different items; flowers, tickets, photo negatives, ribbons to make a 'scrappy-chic' tag! Try adding some spray paint to a journaling card and then layering different textures together, chipboard, crackle paint, fabric, paper scraps.


Have fun and remember to post a link!!